Search H3r3

Tuesday, 26 March 2019

Install NFS Server

Environment

Here, I will be using CentOS 7 minimal and Fedora 27 system. This guide is also applicable for Oracle Linux and older version of Fedora systems.
Here are my demo nodes details.
NFS Server Hostname: server.itzgeek.local (CentOS 7)

NFS Server IP Address: 192.168.12.5/24
NFS Client Hostname: client.itzgeek.local (Fedora 27)

NFS Client IP Address: 192.168.12.7/24

Usage of NFS

  • File / Folder sharing between *nix systems
  • Allows to mount remote filesystems locally
  • Can be acted as Centralized Storage system
  • It can be used as a Storage Domain ( Datastore) for VMware and other Virtualization Platform.
  • Allows applications to share configuration and data files with multiple nodes.
  • Allows to have updated files across the share.

Important Services

The following are the important NFS services, included in nfs-utils packages.
rpcbind : The rpcbind server converts RPC program numbers into universal addresses.
nfs-server :  It enables the clients to access NFS shares.
nfs-lock / rpc-statd : NFS file locking. Implement file lock recovery when an NFS server crashes and reboots.
nfs-idmap : It translates user and group ids into names, and to translate user and group names
into ids

Important Configuration Files

You would be working mainly on below configuration files, to setup NFS server and Clients.
/etc/exports : It is the main configuration file, controls which file systems are exported to remote hosts and specifies options.
/etc/fstab : This file is used to control what file systems including NFS directories are mounted when the system boots.
/etc/sysconfig/nfs : This file is used to control which ports the required RPC services run on.
/etc/hosts.allow, and /etc/hosts.deny : These files are called TCP wrappers, controls the access to NFS server. It is used by NFS to decide whether or not to accept a connection coming in from another IP address

Install NFS Server

We need to install NFS packages on NFS server, install it using the following command.
[root@server ~]# yum install nfs-utils libnfsidmap
Once the packages are installed, enable and start NFS services.
systemctl enable rpcbind
systemctl enable nfs-server
systemctl start rpcbind
systemctl start nfs-server
systemctl start rpc-statd
systemctl start nfs-idmapd

Create NFS Share

Now, let’s create a directory to share with client servers. Here I will be creating a new directory named “nfsfileshare” in “/” partition.
Note: You can also share your existing directory with NFS.
[root@server ~]# mkdir /nfsfileshare
Allow client servers to read and write to the created directory.
[root@server ~]# chmod 777 /nfsfileshare/
We have to modify “/etc/exports“file to make an entry of directory “/nfsfileshare” that you want to share.
[root@server ~]# vi /etc/exports

/nfsfileshare 192.168.12.7(rw,sync,no_root_squash)
/nfsfileshare : shared directory
192.168.12.20 IP address of client machine. We can also use the hostname instead of an IP address. It is also possible to define the range of clients with subnet like 192.168.12.0/24.
rw : Writable permission to shared folder
sync :  all changes to the according filesystem are immediately flushed to disk; the respective write operations are being waited for.
no_root_squash : By default, any file request made by user root on the client machine is treated as by user nobody on the server. (Exactly which UID the request is mapped to depends on the UID of user “nobody” on the server, not the client.) If no_root_squash is selected, then root on the client machine will have the same level of access to the files on the system as root on the server.
You can get to know all the option in the man page (man exports) or here.
Export the shared directories using the following command.
[root@server ~]# exportfs -r
Extras:
exportfs -v : Displays a list of shares files and export options on a server
exportfs -a : Exports all directories listed in /etc/exports
exportfs -u : Unexport one or more directories
exportfs -r : Reexport all directories after modifying /etc/exports
After configuring NFS server, we need to mount that shared directory in the client-server.

Configure Firewall

We need to configure firewall on NFS server to allow client servers to access NFS shares. To do that, run the following commands on the NFS server.
firewall-cmd --permanent --zone public --add-service mountd
firewall-cmd --permanent --zone public --add-service rpc-bind
firewall-cmd --permanent --zone public --add-service nfs
firewall-cmd --reload

Configure NFS client

We need to install NFS packages on NFS client-server to mount remote filesystem, install NFS packages using below command.
[root@client ~]# yum -y install nfs-utils libnfsidmap
Once the packages are installed, enable and start NFS services.
systemctl enable rpcbind
systemctl start rpcbind

Mount NFS shares on clients

Before mounting the NFS share, we need to check the available shares on the NFS server. To do that,  run the following command on the client-server.
[root@client ~]# showmount -e 192.168.12.5

Export list for 192.168.12.5:
/nfsfileshare 192.168.12.7
As per the command, the /nfsfileshare is available on 192.168.12.5.
Extras:
showmount -e : Shows the available shares on your local machine (NFS Server).
showmount -e <server-ip or hostname>: Lists the available shares on the remote server
Now, create a mount point to mount the shared folder ‘/nfsfileshare’ which we’ve created before in the server.
[root@client ~]# mkdir /mnt/nfsfileshare
Use below command to mount a shared directory “/nfsfileshare” from NFS server “192.168.12.5” in “/mnt/nfsfileshare” on client-server.
[root@client ~]# mount 192.168.12.5:/nfsfileshare /mnt/nfsfileshare
Verify the mounted share on client server using “mount” command.
[root@client ~]# mount | grep nfs

sunrpc on /var/lib/nfs/rpc_pipefs type rpc_pipefs (rw,relatime)
nfsd on /proc/fs/nfsd type nfsd (rw,relatime)
192.168.12.5:/nfsfileshare on /mnt/nfsfileshare type nfs4 (rw,relatime,vers=4.1,rsize=262144,wsize=262144,namlen=255,hard,proto=tcp,port=0,timeo=600,retrans=2,sec=sys,clientaddr=192.168.12.7,local_lock=none,addr=192.168.12.5)
Also, you can use “df” command to check the mounted NFS share.
[root@client ~]# df -hT

Filesystem                 Type      Size  Used Avail Use% Mounted on
devtmpfs                   devtmpfs  478M     0  478M   0% /dev
tmpfs                      tmpfs     489M     0  489M   0% /dev/shm
tmpfs                      tmpfs     489M  620K  488M   1% /run
tmpfs                      tmpfs     489M     0  489M   0% /sys/fs/cgroup
/dev/mapper/fedora-root    xfs        18G  1.3G   17G   8% /
tmpfs                      tmpfs     489M  4.0K  489M   1% /tmp
/dev/sda1                  ext4      477M   93M  355M  21% /boot
tmpfs                      tmpfs      98M     0   98M   0% /run/user/0
192.168.12.5:/nfsfileshare nfs4       50G  858M   50G   2% /mnt/nfsfileshare
Create a test file on the mounted directory to verify the read and write access on NFS share.
[raj@client ~]$ touch /mnt/nfsfileshare/test
If the above command returns no error, you have working NFS setup.

Automount NFS Shares

To mount the shares automatically on every reboot, need to modify “/etc/fstab” file of your client system.
Add “green” line at the end.
[root@client ~]# vi /etc/fstab

#
# /etc/fstab
# Created by anaconda on Tue May 26 21:30:49 2015
#
# Accessible filesystems, by reference, are maintained under '/dev/disk'
# See man pages fstab(5), findfs(8), mount(8) and/or blkid(8) for more info
#
/dev/mapper/fedora-root /                       xfs     defaults        0 0
UUID=f748af6c-0de9-4dc0-98e6-959ffc400f2f /boot                   ext4    defaults        1 2
/dev/mapper/fedora-swap swap                    swap    defaults        0 0
192.168.12.5:/nfsfileshare/ /mnt/nfsfileshare nfs rw,sync,hard,intr 0 0
save and close the file.
Reboot the client machine and check the share whether it is automatically mounted or not.
[root@client ~]# reboot
Verify the mounted share on client server using “mount” command.
[root@client ~]# mount | grep nfs
sunrpc on /var/lib/nfs/rpc_pipefs type rpc_pipefs (rw,relatime)
nfsd on /proc/fs/nfsd type nfsd (rw,relatime)
192.168.12.5:/nfsfileshare on /mnt/nfsfileshare type nfs4 (rw,relatime,sync,vers=4.1,rsize=262144,wsize=262144,namlen=255,hard,proto=tcp,port=0,timeo=600,retrans=2,sec=sys,clientaddr=192.168.12.7,local_lock=none,addr=192.168.12.5)
If you want to unmount that shared directory from your client server after you are done with the file sharing, you can unmount that particular directory using“umount” command.
[root@client ~]# umount /mnt/nfsfileshare
If you wish not to use static mounts, you can configure AutoFS on CentOS 7 to mount NFS share only when they are accessed by a user.
That’s All. You have successfully setup NFS Server on CentOS 7 / RHEL 7 / Fedora 26.

Monday, 25 February 2019

Samba – How to set up a Samba client on CentOS/RHEL 7

Samba – How to set up a Samba client on CentOS/RHEL 7

If you have directories on your machine that you want to share out to other machines then you can do this by setting up your machine as an NFS server. However with NFS you can only share out folders to machine that are in the same private network. If you want share folders to other machines over the public internet, then that’s where you need to use the Samba/CIFS protocol. You can follow along this article using this vagrant project on Github.
We will walk through the following example:

+--------------------------+              +--------------------------+
|                          |              |                          |
|      samba-storage       |              |       samba-client       |
|     (IP: 10.0.4.10)      |              |                          |
|                          |              |                          |
|                          |              |                          |
|                          |              |                          |
|  +------------------+    |              |     +---------------+    |
|  | /samba/export_rw |<----------------------->| /mnt/dcp |    |
|  +------------------+    |              |     +---------------+    |
|                          |              |                          |
|                          |              |                          |
+--------------------------+              +--------------------------+
In this article we’ll cover setting up the samba client side. We cover setting up a Samba server in a separate article.

First you need to install the samba software:

$ yum -y install samba samba-client cifs-utils
 
Note: It’s recommended to install the samba server software on all samba
clients.

Then we create our mount point:

$ mkdir -p /mnt/dcp
 
Then we create a group that mirrors the same group that existing on the samba server:

$ groupadd --gid 2000 sambagroup
 
Now we need to add members to that group, in our case we’ll add the root user:

$ usermod -aG sambagroup root
 
Next we need check if we can connect to the samba server, and if we can to also check what shares are available:

$ smbclient -L //samba-storage.local -U samba_user1
Enter SAMBA\samba_user1's password:
 
 
 Domain=[SAMBA-STORAGE] OS=[Windows 6.1] Server=[Samba 4.6.2]

 Sharename       Type      Comment
 ---------       ----      -------
 print$          Disk      Printer Drivers
 bckp_storage    Disk      Folder for storing backups
 IPC$            IPC       IPC Service (Samba server samba-storage)
 samba_user1     Disk      Home Directories
Domain=[SAMBA-STORAGE] OS=[Windows 6.1] Server=[Samba 4.6.2]

 Server               Comment
 ---------            -------

 Workgroup            Master
 ---------            -------
Now we can test this by manually mounting this share like this:

$ mount -t cifs -o user=samba_user1,password=password123 //samba-storage.local/export_rw /mnt/dcp/
 
You can check if this command has worked using the mount or df -h commands.

To unmount this, do:

$ umount /mnt/dcp

If you has, then you automount this samba share at boot time by adding the following entry to the vi/etc/fstab file:

//samba-storage.local/bckp_storage /mnt/dcp  cifs  username=samba_user1,password=password123,soft,rw  0 0
 
To test this line, just run:

$ mount -a

Then check again if this has mounted successfully using mount or df -h commands. If all is well try creating dummy content in the mountpoint and see if the content also shows up on the samba server.

Monday, 18 February 2019

Mount Windows Share From Centos

The mount.cifs file is provided by the samba-client package. This can be installed from the standard CentOS yum repository by running the following command:


yum install samba samba-client
 
 
Once installed, you can mount a Windows SMB share on your CentOS server by running the following command:


Syntax:
mount.cifs //SERVER_ADDRESS/SHARE_NAME MOUNT_POINT -o user=USERNAME
 
SERVER_ADDRESS: Windows system’s IP address or hostname

SHARE_NAME: The name of the shared folder configured on the Windows system

USERNAME: Windows user that has access to this share

MOUNT_POINT: The local mount point on your CentOS server
I am mounting to a share from \\10.11.10.26\snaps
Make a directory under mount for your reference

mkdir /mnt/mymount
 
Now I am mounting the snaps folder from indiafps02, User name is the Domain credentials, i.e. Mydomain in this case

mount.cifs //10.11.10.26/snaps /mnt/mymount -o user=ajeeth,password=curve,dir_mode=0777,file_mode=0777
 
Now you could see the content by typing

ls /mnt/mymount
 
So, after performing your task, just fire umount command

umount /mnt/mymount
 
That's it. You are done.


Thursday, 7 February 2019

Remote Desktop CentOS7

RUN THIS CODING FIRST


1)  rpm --import http://li.nux.ro/download/nux/RPM-GPG-KEY-nux.ro 
 
2)  rpm -Uvh http://li.nux.ro/download/nux/dextop/el7/x86_64/nux-dextop-release-0-1.el7.nux.noarch.rpm
 
3)  yum install rdesktop
 
 
CHECK RDESKTOP VERSION 
 
4)  rpm -qa rdesktop 
 
CONNECT REMOTE DESKTOP PC 

5)  rdesktop -u Ajeeth 192.168.50.5

Monday, 28 January 2019

Install TeamViewer on CentOS 5.x/6.x/7.x

Install TeamViewer on CentOS 5.x/6.x, RHEL, Fedora 15/16/17/18/19


1. cd /opt

2. wget http://download.teamviewer.com/download/version_9x/teamviewer_linux.rpm

3.  yum localinstall teamviewer_linux.rpm

Start TeamViewer:

4.  teamviewer


Sunday, 27 January 2019

Samba installation on RHEL/CentOS 7

Samba installation on RHEL/CentOS 7:

1. yum install samba samba-client samba-common -y

2. vi /etc/samba/smb.conf

[global]
workgroup = WORKGROUP
server string = Samba Server %v
netbios name = centos
security = user
map to guest = bad user
dns proxy = no
[anonymous]
path = /samba/anonymous
browsable =yes
writable = yes
guest ok = yes
read only = no

[dcp]
path = /samba/dcp
browsable =yes
writable = yes
guest ok = yes
read only = no


3. mkdir -p /samba/anonymous

4. systemctl enable smb nmb.service

5. systemctl restart smb nmb.service

6. firewall-cmd --permanent --zone=public --add-service=samba

7. firewall-cmd --reload

8. chmod -R 0777 anonymous/

9. chown -R nobody:nobody anonymous/

10. chcon -t samba_share_t anonymous/


 Create User and Password :


11. useradd ajeeth

12. groupadd smbgrp

13. usermod -a -G smbgrp ajeeth

14. smbpasswd -a ajeeth

    [root@localhost]# smbpasswd -a rasho
    New SMB password:  YOUR SAMBA PASS
    Retype new SMB password:   REPEAT YOUR SAMBA PASS
    Added user rasho.


15. mkdir /home/yusari

16. chown -R ajeeth:smbgrp /home/yusari/

17. chmod -R 0777 /home/yusari/

18. chcon -t samba_share_t /home/yusari/

19. vi /etc/samba/smb.conf

    [yusari]
    path = /home/yusari
    valid users = @smbgrp
    guest ok = no
    writable = yes
    browsable = yes
    read only = no


20.systemctl restart smb nmb.service

Monday, 19 December 2016

Information Tech (IT): Download Windows 10 ISO (32-bit / 64-bit) https:/...

Information Tech (IT): Download Windows 10 ISO (32-bit / 64-bit) 
https:/...
: Download Windows 10 ISO (32-bit / 64-bit)  https://www.microsoft.com/en-us/software-download/windows10ISO    Here’s how you c...

Download Windows 10 ISO (32-bit / 64-bit) 

Here’s how you can download Windows 10 Pro, Home (x86, x64) ISO images officially and legally directly from Microsoft. You can use these images for recovery or reinstalling Windows 10 later on.
windows10-laptop
Windows 10 is a huge release from the Redmond based software giant. In fact, it’s so big that it’s expected to break the Internet during its rollout period. And with a lot riding on this big release, Microsoft is also aiming to push its OS to at least a billion devices in two to three years. Bold claim indeed.
Packed to the rafters with new and improved features, Windows 10 breaks away from the tried and tested Windows releases which have come accustomed to and dives head first into a territory which blurs the line between the present and the future. With great features to boot such as Continuum tablet mode, Microsoft has made sure that its desktop operating system is ready for next-generation of hardware from different manufacturers.
All that sounds good on paper, and things get even better knowing that Windows 10 will be a free upgrade for Windows 7 Service Pack 1 and Windows 8.1 Update users. And if you’re a qualifying individual, you can grab Windows 10 from Windows Update right now, or you can take the geek route and download the ISO files directly from Microsoft onto your PC, later on which you can use to create a bootable USB or DVD.

Download Windows 10 ISO Image

1. Download the official tool for downloading Windows 10 ISO files from here and launch it.
2. Click on the ‘Create installation media for another PC’ option. Click on ‘Next.’
Screenshot (12)
3. Over here you’ll be presented with three options: Language, Edition and Architecture. Carefully fill in the form for the Windows 10 ISO you wish to download. Once you’ve decided what you want to download, click on ‘Next.’ We would suggest reviewing your choices once more just in case.
Screenshot (13)
4. Select the ‘ISO file’ option and then select the place you wish to save it then click on the ‘Save’ button to begin the download process.
Screenshot (14)
Screenshot (15)
If you have a slow Internet connection, then the download can take up to a few hours, so be patient while things are in progress. We would also suggest that you not to use your PC during this time period to make sure that everything goes as smoothly as possible.
Done downloading your Windows 10 ISO file? You are all set to either create a bootable Windows 10 USB drive or a bootable Windows 10 DVD, or if you like, you can backup the ISO file onto an external drive for safekeeping.
If you just want to upgrade straight away, then be sure to check out: Download and Install Windows 10 Right Now.

Monday, 20 October 2014

Information Tech (IT): Create a Bootable Install USB Drive of Mac OS X 10...

Information Tech (IT): Create a Bootable Install USB Drive of Mac OS X 10...:  Create a Bootable Install USB Drive of Mac OS X 10.10 Yosemite Apple released the new  Mac OS X 10.10 Yosemite  in the Mac App Store...

Information Tech (IT): Create a Bootable Install USB Drive of Mac OS X 10...

Information Tech (IT): Create a Bootable Install USB Drive of Mac OS X 10...:  Create a Bootable Install USB Drive of Mac OS X 10.10 Yosemite Apple released the new  Mac OS X 10.10 Yosemite  in the Mac App Store...

Information Tech (IT): Create a Bootable Install USB Drive of Mac OS X 10...

Information Tech (IT): Create a Bootable Install USB Drive of Mac OS X 10...:  Create a Bootable Install USB Drive of Mac OS X 10.10 Yosemite Apple released the new  Mac OS X 10.10 Yosemite  in the Mac App Store...

Create a Bootable Install USB Drive of Mac OS X 10.10 Yosemite


Apple released the new Mac OS X 10.10 Yosemite in the Mac App Store for everyone to download and install for free on October 16th, 2014, but downloading a 5+ GB file for each of your computers will take some serious time. The best thing to do is download it once and create a bootable install USB drive from the file for all of your Macs.
Just make sure that once you have the installation app for Yosemite in your Applications folder, which will be named "Install OS X Yosemite," that you don't install it yet. (Previous versions of the app installer were named "Install OS X 10.10 Developer Preview" and "Install OS X Yosemite Beta.")
Once you install Yosemite, the file will automatically erase itself, so it's important to make a bootable drive first. If you want to install first and then make a bootable drive, make a copy of the installer app in another location so you can access it later. Worst case scenario is downloading the large file again from the Mac App Store, but then why make a bootable drive?

The Easiest Way: Use DiskMaker X

By far the easiest way to create a bootable drive is to use the DiskMaker X application, which automates the entire process in the next method. To start out, download the newest version of DiskMaker X from its website. Currently, that's the Yosemite Beta version. A regular Yosemite one is currently in the works, but the Beta will suffice for now, though you should keep an eye out for the new one and just use that.
Once download, open it up and select "Yosemite Beta" to start the process.
You'll be warned about it being a beta software, but once you get passed that, make sure to select "Use this copy" to use the installer app it found in your Applications folder. If you have more than one installer like I do, you'll want to make sure to do it manually.
Next, select what type of drive you have. I'm using a 16 GB drive, but I still chose the "An 8 GB USB thumb drive" option. Afterward, select your drive from the list.
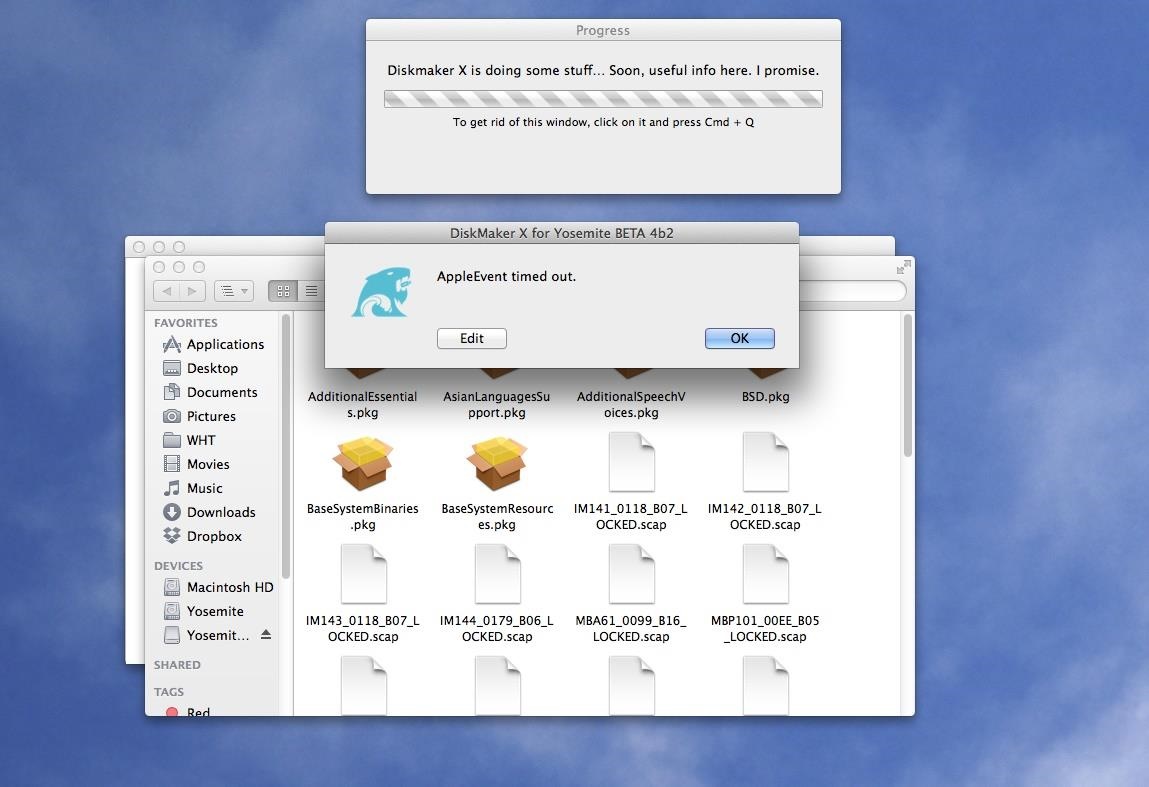
Then just follow the rest of the prompts to start the disk-making process. It could take anywhere from 15 minutes to to 45 minutes to finish, depending on your USB flash drive. If it's more toward the latter, you might get a "AppleEvent timed out" error, but it should still work, according to the developer (it worked for me).

The Less Easy Way: Format & Use Terminal

If you're more comfortable with Terminal commands, this is the method for you. Just make sure your USB drive is already formatted correctly before proceeding. To see how to correctly format your USB drive, please see Step #1 below in the "The Hardest Way" section.
With your USB drive ready to go, open up Terminal and type (or copy/paste) the following command.
  • sudo /Applications/Install\ OS\ X\ Yosemite.app/Contents/Resources/createinstallmedia --volume /Volumes/Yosemite --applicationpath /Applications/Install\ OS\ X\ Yosemite.app --nointeraction
Note that you should replace the "Yosemite" in "Volumes/Yosemite" with whatever you named your USB drive.
This should all be one line. After you get it in there, just hit the Enter key. Type in your admin password to continue and the Enter again. (You won't visibly see your password typing, but it's happening—believe me.)
Now just wait. This could be fairly quickly or very long, depending on your system and USB drive.

The Hardest Way: Do Everything Manually

If you don't want to use DiskMaker X or Terminal commands, this is another option for you. It's a lot more complicated, but gets the job done.

Step 1: Reformat Your USB Drive

First, make sure you have a USB flash drive that's at least 8 GBs in size, then mount it. Open up Disk Utility and do the following.
  1. Select the USB drive (not the partition)
  2. Go to the Partition tab
  3. Change the "Partition Layout" to 1 Partition
  4. Rename it Yosemite (or whatever you want)
  5. Select Mac OS Extended (Journaled) as the "Format"
  6. Click the Options... button
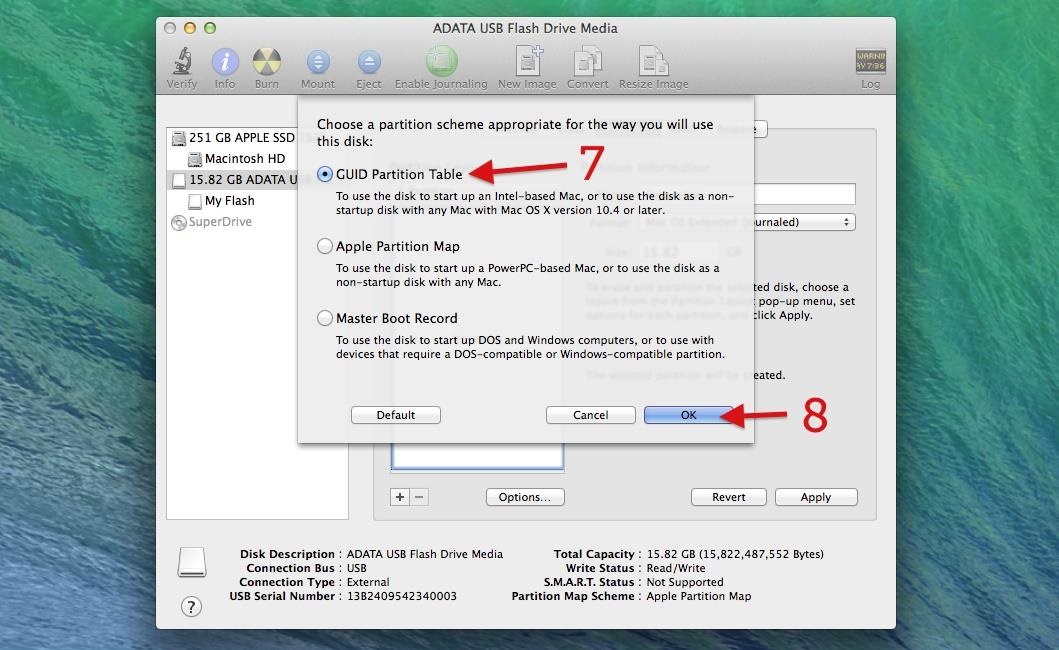
  1. Select GUID Partition Table
  2. Hit OK
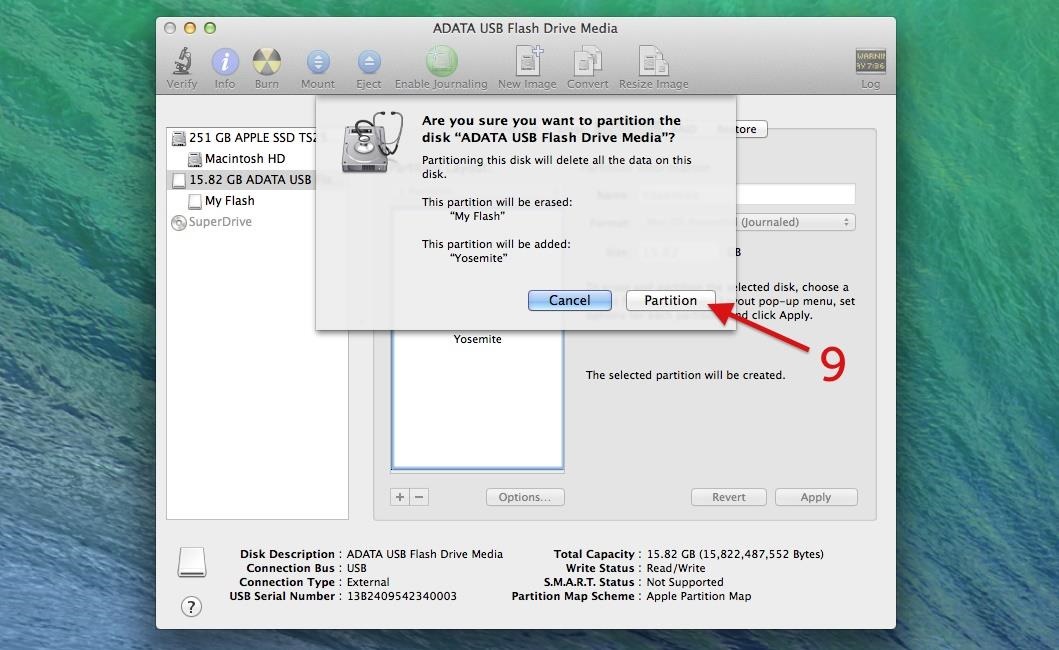
  1. Confirm by clicking on Partition
Then just wait for it to finish erasing and repartitioning your USB flash drive. It will mount back up when it's done.

Step 2: Open the InstallESD Disk Image

Now that your USB thumb drive is ready, you'll need to open theInstallESD.dmg file from your Yosemite Install app.
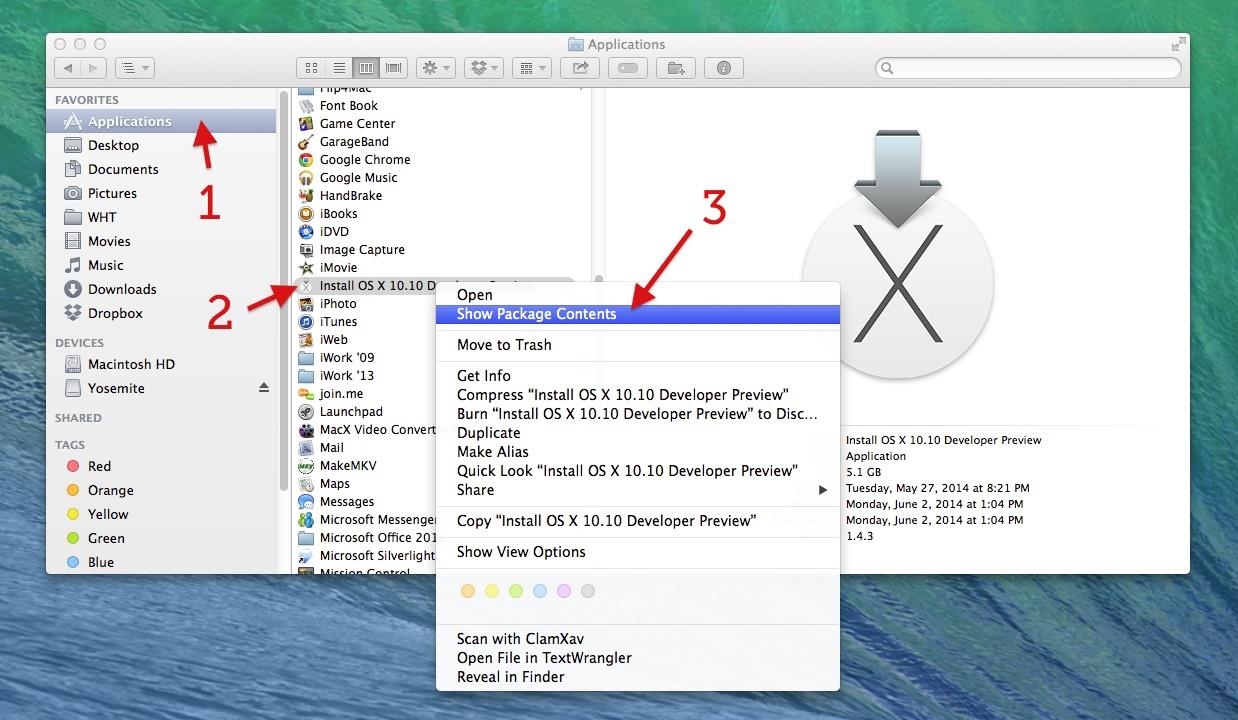
  1. Head to Applications
  2. Find the Install OS X Yosemite app
  3. Right-click on it and Show Package Contents
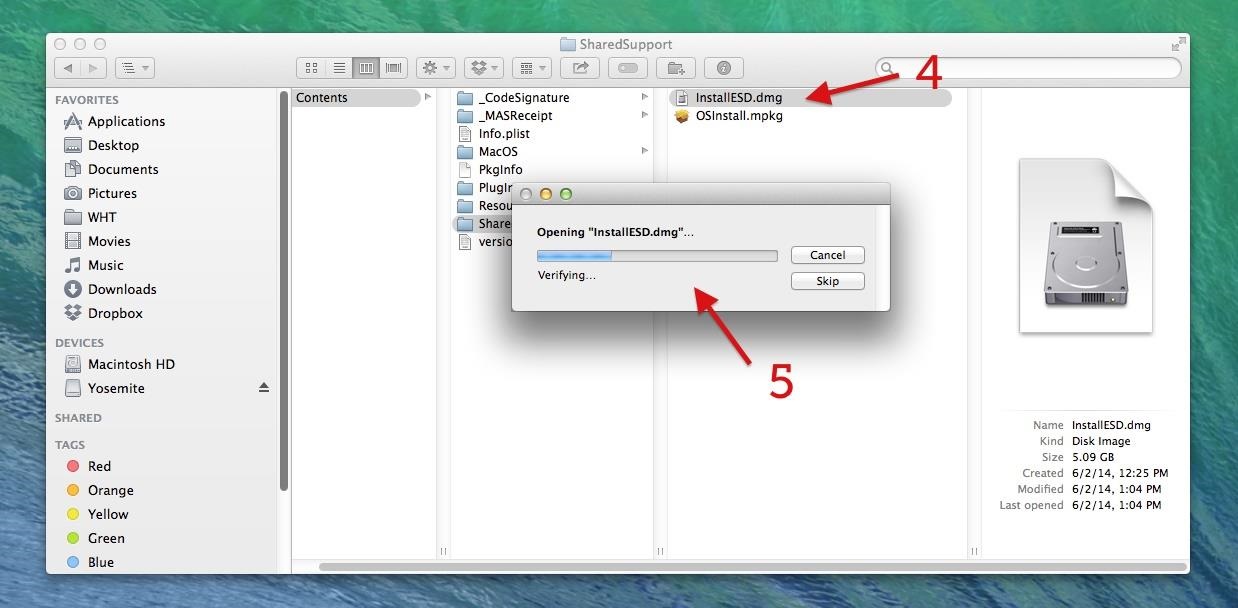
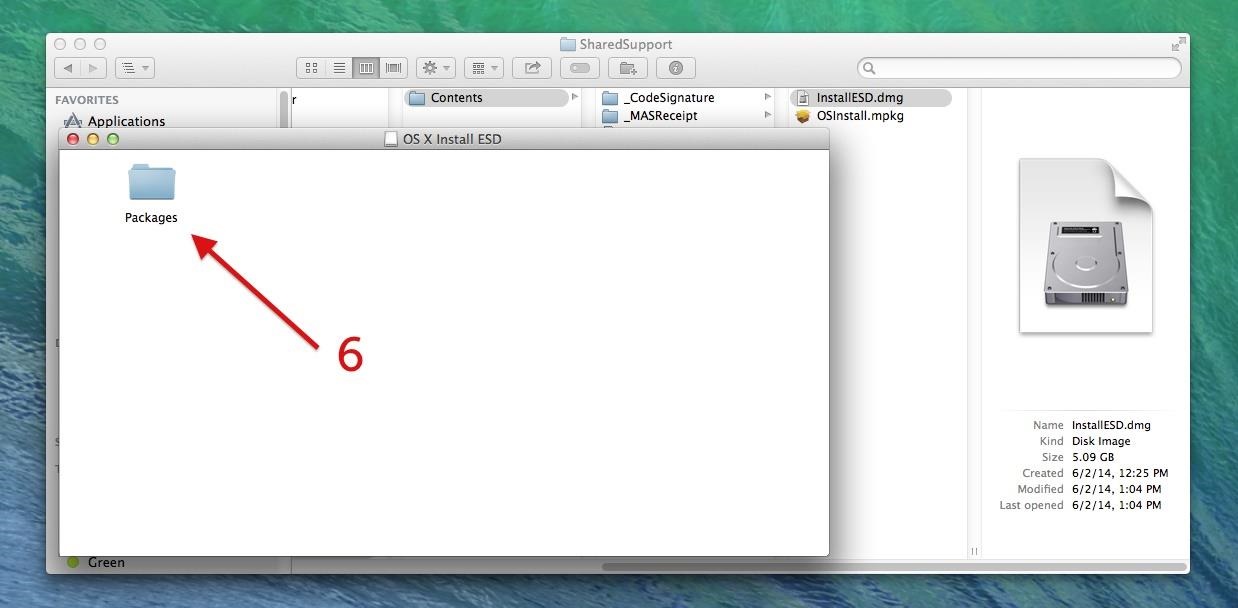
  1. Navigate to Contents -> SharedSupport and open InstallESD.dmg
  2. Wait for it to finish Verifying... and mount
  1. When it mounts, you'll see a new window with a Packages folder
Now, don't do anything with this Packages folder just yet. First, we need to unhide the files located in this newly mounted OS X Install ESD image.

Step 3: Unhide All Files in Finder

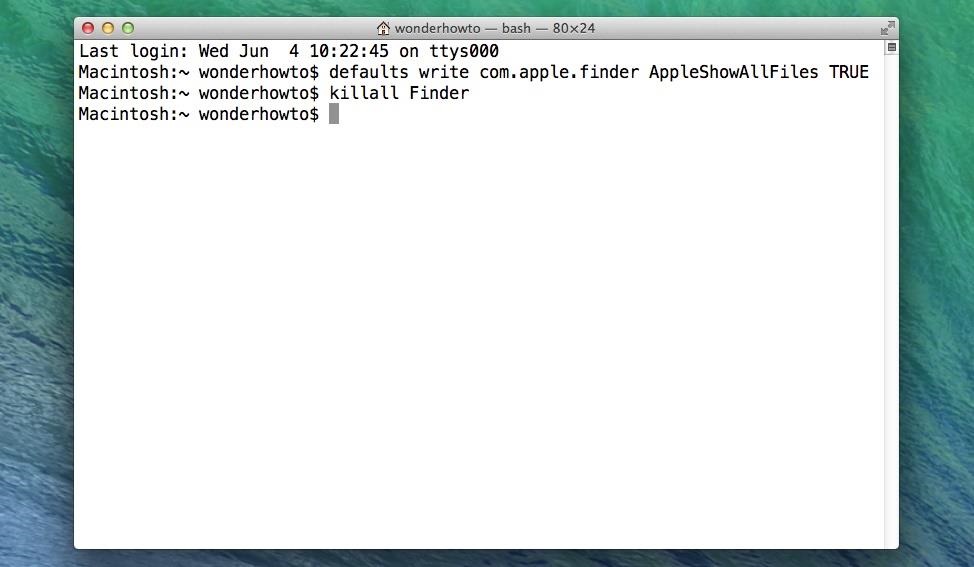
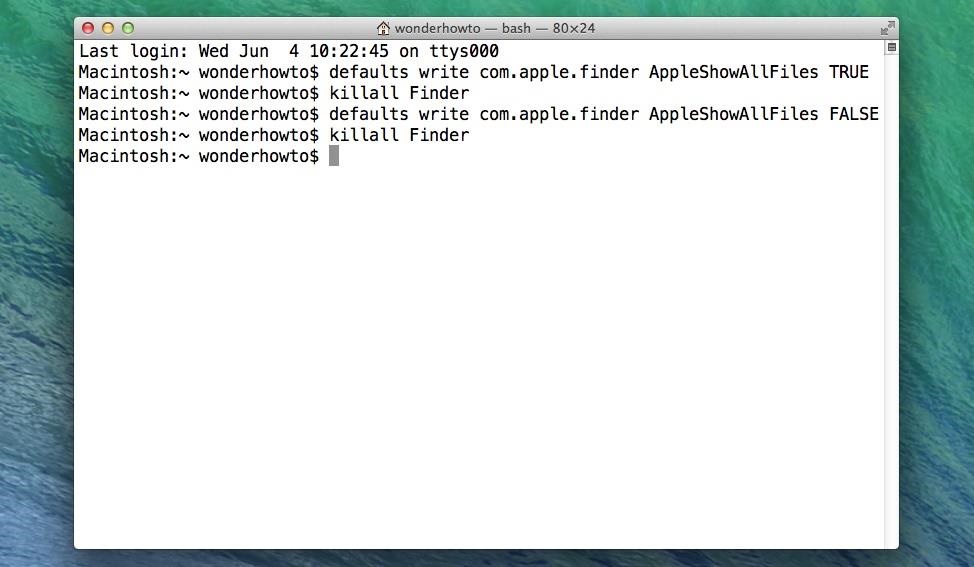
To see the hidden files in the OS X Install ESD image, open up a Terminal and input the following two commands (hit Enter after each one). And don't worry, we'll be undoing this at the end of this guide.
  • defaults write com.apple.finder AppleShowAllFiles TRUE
  • killall Finder
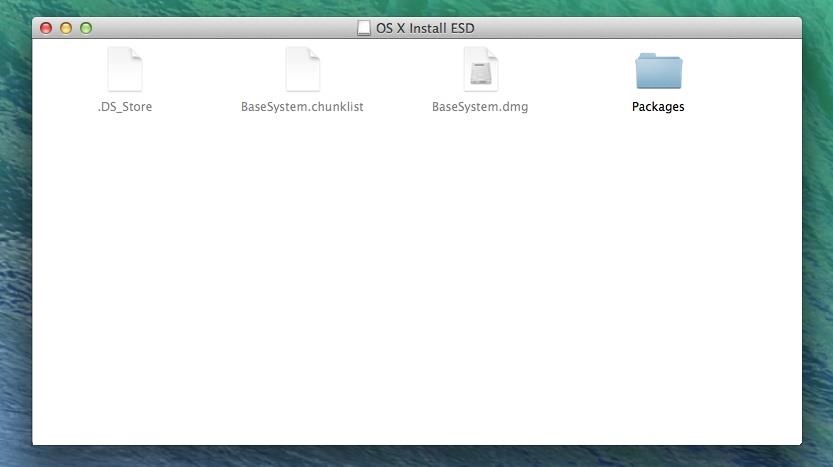
If successful, you will see three other files slightly grayed out in the mounted OS X Install ESD window. The one we need here is BaseSystem.dmg.

Step 4: Restore Your USB Drive to BaseSystem

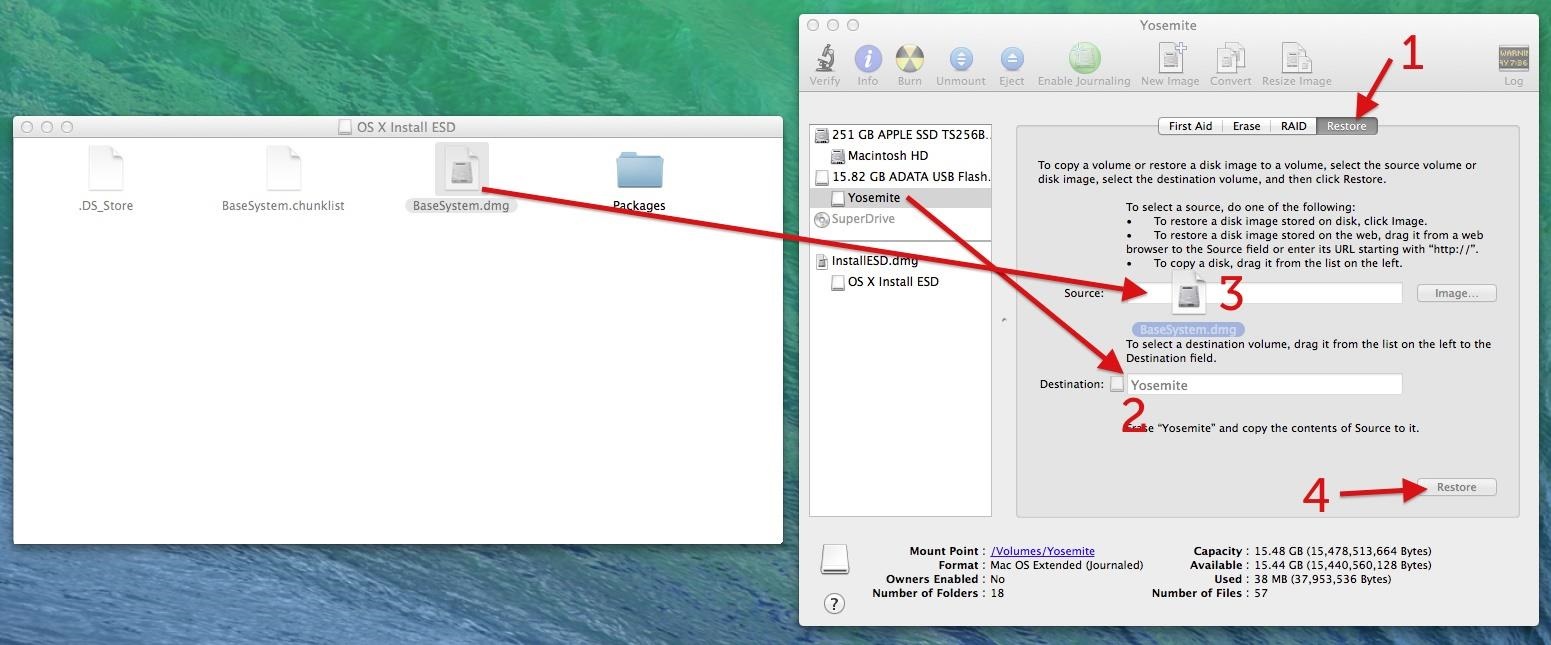
Now, go back into Disk Utility and select the Yosemite partition of your mounted USB flash drive.
  1. Open the Restore tab
  2. Drag and drop Yosemite down to the Destination path
  3. Drag and drop BaseSystem.dmg to the Source path
  4. Hit the Restore button
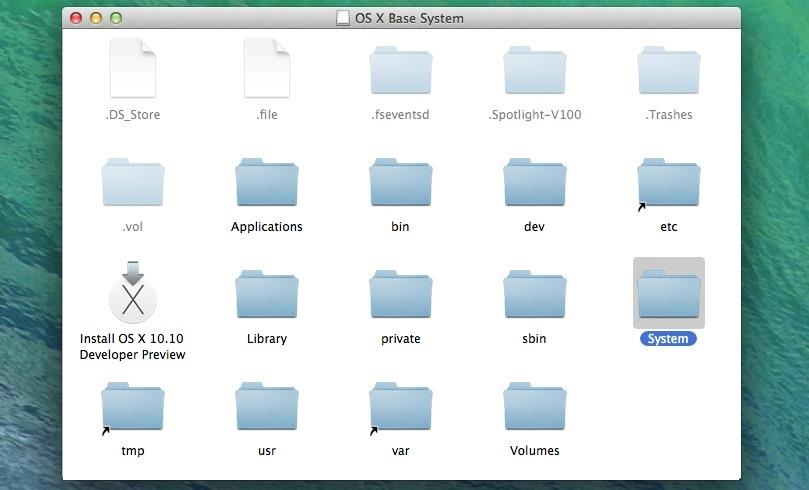
Then, on the following prompts, click on Erase to initiate the restore process, then enter in your admin password and hit OK to proceed. Afterward, you'll have to wait a few minutes until it remounts. Once it does, you should see the OS X Base System window open.
System is the folder we're looking for, so proceed to the next step.

Step 5: Move the Packages Folder Over to Your Drive

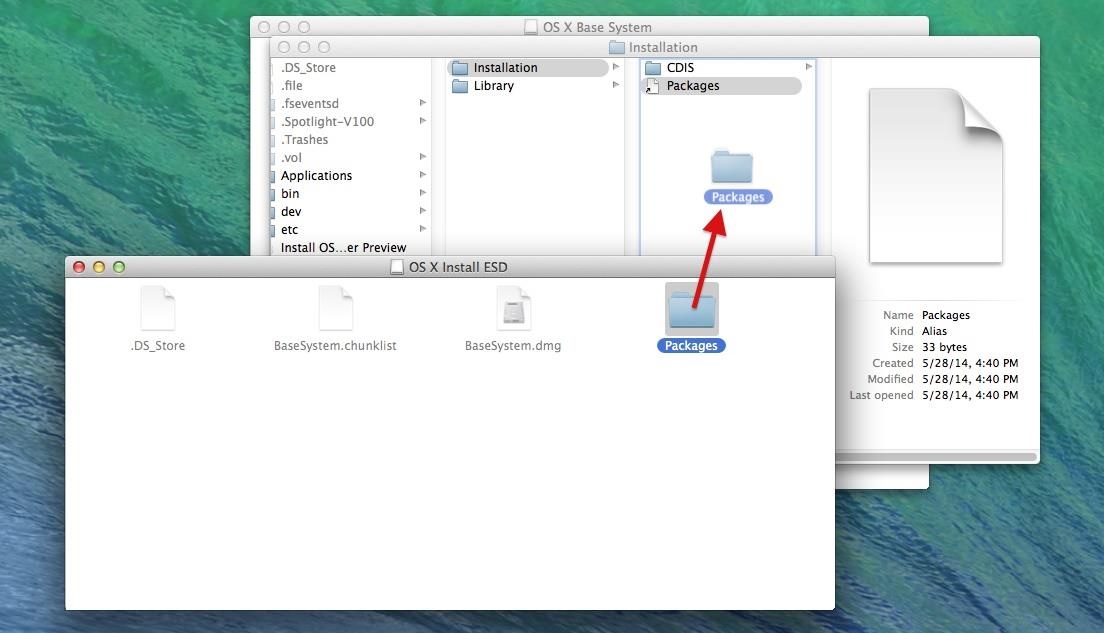
Go ahead and open the System folder. A new window should pop up, and once it does, open the Installation folder. Then, head back to your OS X Install ESD window and drag and drop the Packages folder inside of theInstallation folder.
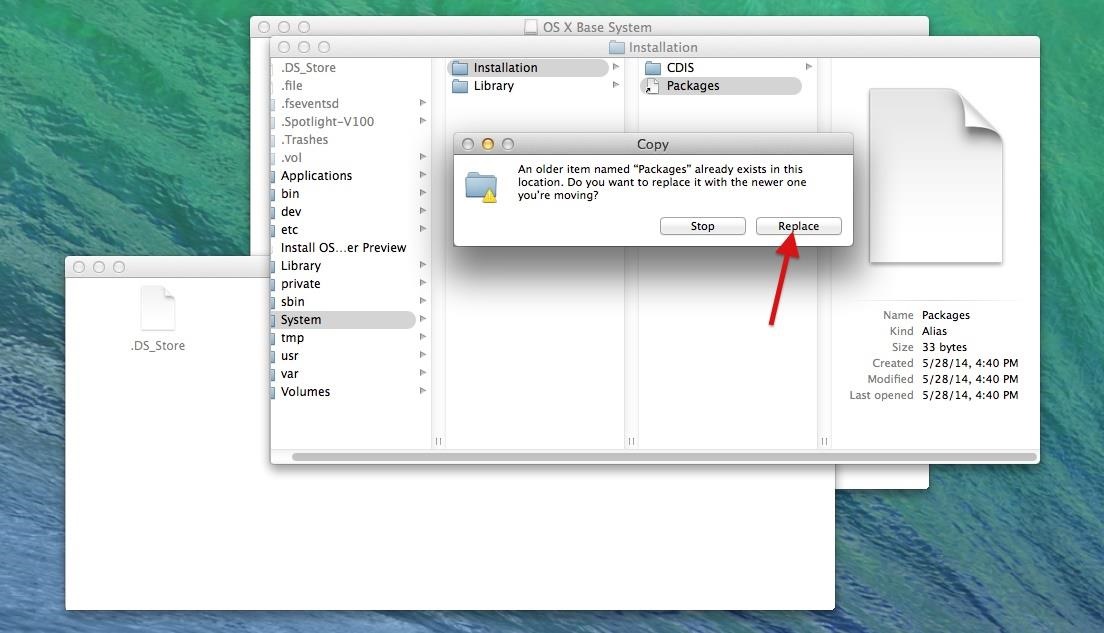
Go ahead and hit Replace to confirm that you want to write over thePackages alias, then wait for it to finish copying over. This will take a few minutes, as it's over 4 GBs large.
And we're almost done now. Only a couple things left to copy over...

Step 6: Copy Over the BaseSystem Files

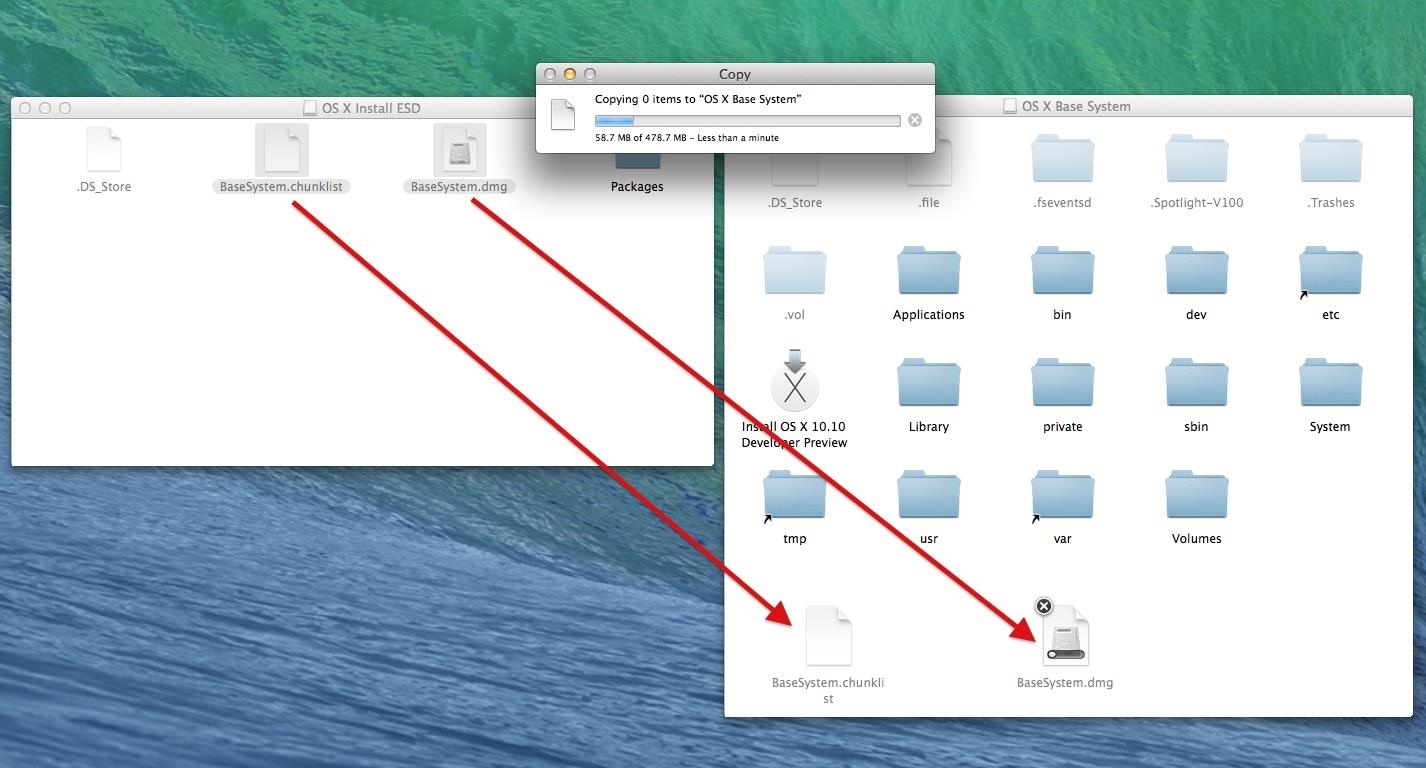
Now, you need to go back to the root of your OS X Base System partition and copy the BaseSystem.chunklist and BaseSystem.dmg files from the OS X Install ESD window where you grabbed the Packages folder from. It should take less than a minute to copy over.

Step 7: Hide All Files in Finder

Unless you want to see a bunch of grayed out hidden files on your Mac, I'd suggest you rehide them all. To do so, open up Terminal again and do the following two commands.
  • defaults write com.apple.finder AppleShowAllFiles FALSE
  • killall Finder
After your Finder reloads, the hidden files you once saw before should now be gone. Go ahead and close all of your windows, exit Terminal and Disk Utility, and eject your mounted disks to clean up your mess.

Installing Yosemite on Your Computer

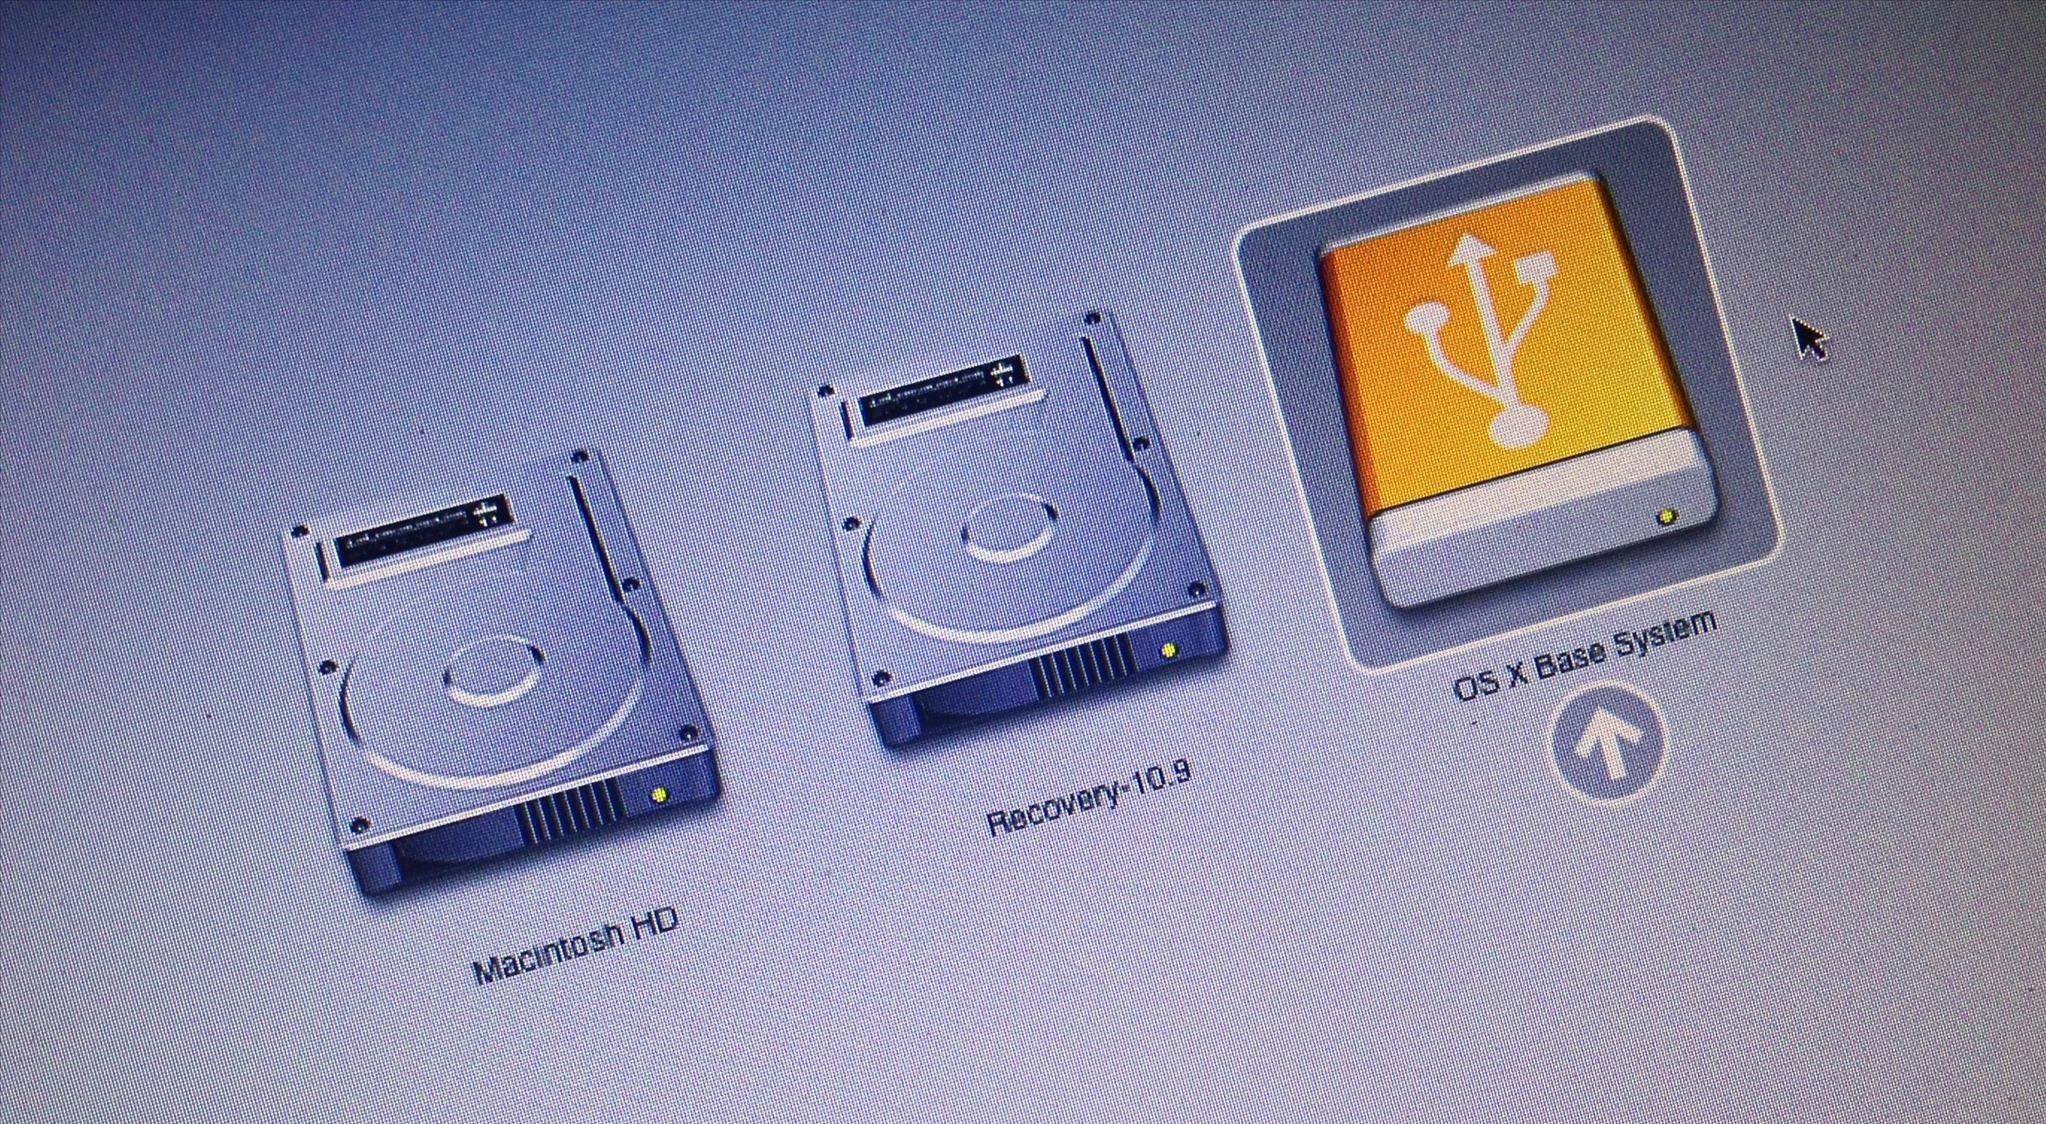
Now, it's time to test out your new drive. Restart your computer while holding the Option (Alt) key on your keyboard. Wait until the Startup Manager pops up, then select your new OS X Base System volume (or whatever your bootable drive is called). Alternatively, you can just hold down the C button while starting up to boot directly into the USB drive.
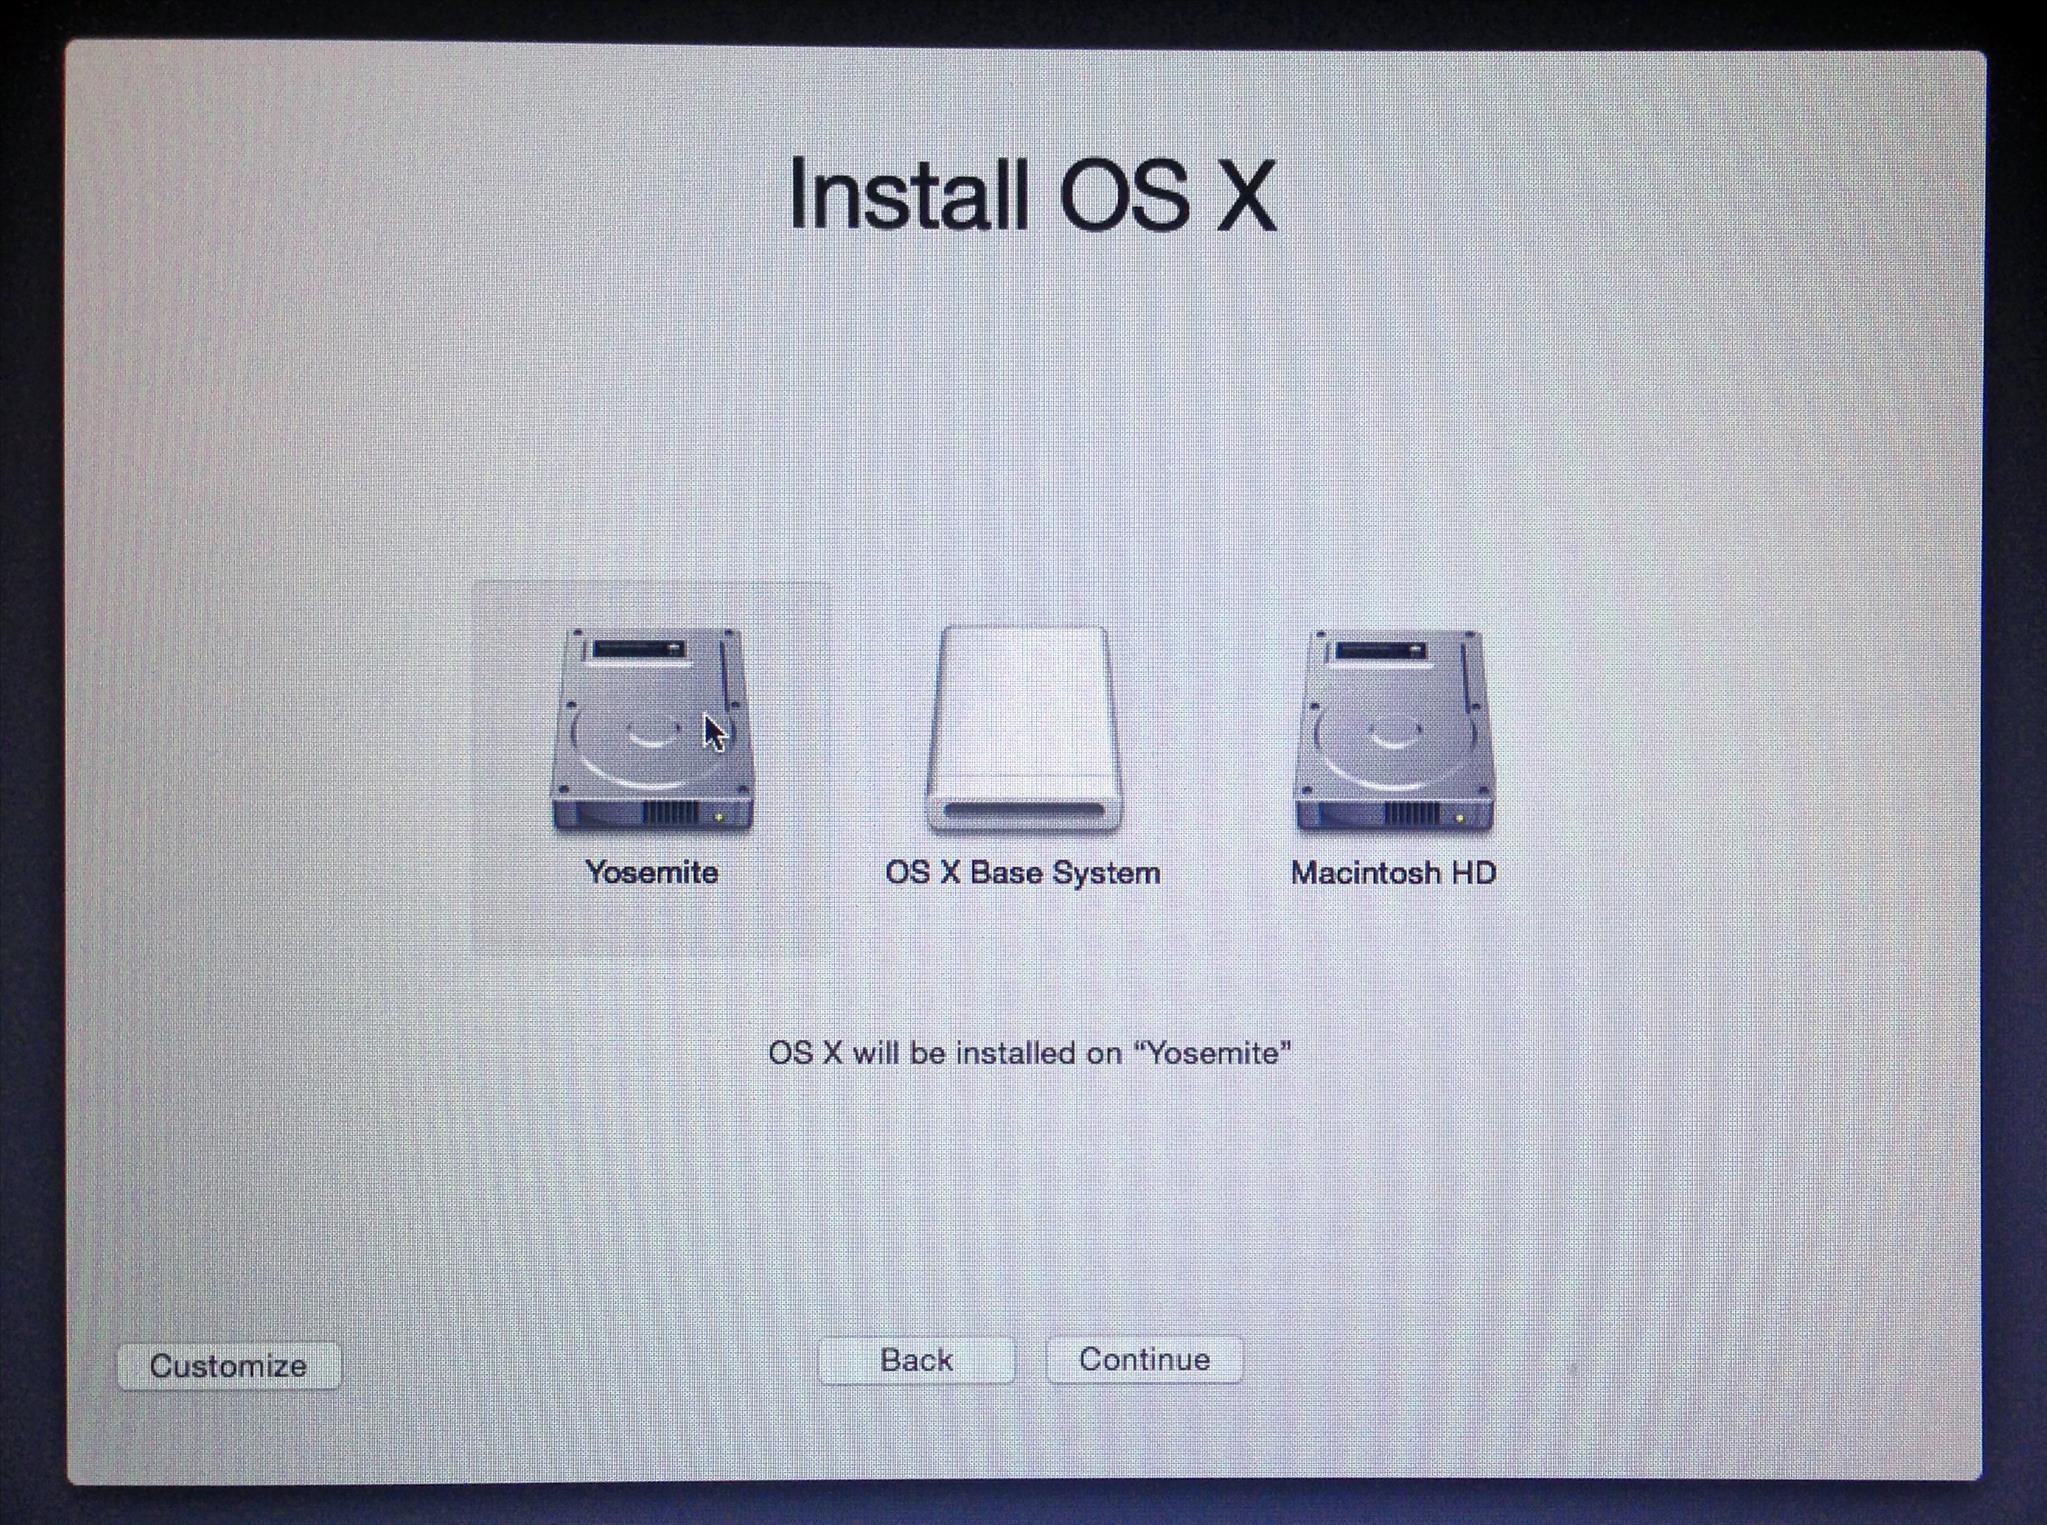
Then just follow the install instructions and wait for your new Yosemite experience. When you come to the Install OS X screen, make sure to select the right disk. I created a new partition on my hard drive called "Yosemite," so I used that.
Once it's done installing, you'll get to the Welcome screen, and you should be able to figure it out from there.

Troubleshooting Tips

If the installation of Yosemite freezes, it's probably because your USB drive is corrupted in some way. This happened to me on the first couple tries, where it would freeze at 5 minutes left. The third USB stick I used was successful, and it took less than 15 minutes for Yosemite to boot up.
If you're getting an Undefined error: 0 warning when trying to install, this more than likely means that you forgot to perform Step 6 above, so make sure to copy over those two BaseSystem files.
If you got the "AppleEvent timed out" error using DiskMaker X, more than likely it'll still work. Just eject the new drive and use it. If it doesn't work, try one of the other methods out to start over.
If you're not sure if you're going to like Yosemite over Mavericks, I would suggest adding another partition to your Mac and installing Yosemite there, that way if anything goes wrong, your Mavericks installation will still be untouched.